How To Advertise On Facebook – Revealing My Facebook Marketing Strategy
February 2, 2015 | By Matthew Woodward | One Comment">One Comment
I have spent a fair amount of time learning how to advertise on Facebook properly with lead generation in mind as part of my wider social media marketing strategy.
I’ve spent a good chunk of cash experimenting with this and today I’m going to share everything I have learnt with you step by step!

What You Will Learn
- The full details of my 2,691% & 2,851% ROI Facebook campaigns
- How to create & market an offer on Facebook
- How to setup & split test landing pages
- How to setup Facebook advertising campaigns
- How to track & optimise your campaigns
Getting Started With Facebook Advertising
There are a few things that you will need to get started with advertising on Facebook.
I’m going to take you through each of these and show you how easy it is to set everything up step by step.
An effective Facebook marketing campaign has-
- Clearly defined goals
- Email auto responder
- A compelling offer
- A landing page
Once you have those things in place you can start setting up your Facebook ads.
Defining Goals
First you need to define the goals of your campaign.
This is going to vary depending on your business but I have found the most effective way to reach people is via the classic email opt in process.
Show visitors a compelling offer, collect their email address and then market to them with an email auto responder.
I have found if you are trying to get people to buy a product directly from the advert itself it is much trickier to get conversions.
Instead you should be looking at the long term value of an email subscriber.
My Campaign Goals
With that in mind I defined the goals of my Facebook advertising campaign as follows-
- Increase email subscribers
- Increase Facebook page likes
Pretty straight forward really ![]()
Setting Up My Email Auto Responder
I used Aweber to create an Email autoresponder which is designed to keep people constantly engaged with my brand consistently extracting value over time.
It does this in a number of ways-
The first email asks people to connect with me on social media and introduce themselves – growing my social media following.
The second email asks people how I can help them, I invite them to ask me any question they want on the forum.
This creates new user generated content on the site, ranking for long tail keywords. It also creates a strong relationship with new subscribers even if they don’t ask a question.
After that the rest of the email auto responder sends out 1 of my tutorials from the archives every week.
This means old posts are always getting new traffic, new affiliate clicks, new social signals and new comments which help lead to higher search rankings.
I also have a couple of emails that go out asking people what they like/don’t like about the site and which tutorials they would like me to make next.
Those emails have helped shape the blogs success.
Click on the image below to see the full sequence-

Putting A Value On An Email Subscriber
As you can see from the above, it is quite difficult to put a money based value on email subscribers. They offer so much more value than just affiliate clicks/sales.
I decided that the easiest way to put a value on an email subscribers is by keeping it simple.
Over the previous 90 day period use Google Analytics to work out what % of traffic came from email.
Then look at the total earnings for that 90 day period using that %. Finally divide it by how many email subscribers you have.
So for example if you had-
- 40% visitors came from email
- $10,000 profit
- 200 email subscribers
The calculation would look like this-
- 40% of $10,000 = $4,000
- $4,000 / 200 email subscribers = $20 per subscriber
Using that calculation above I have determined that each subscriber is worth $17.81 to me over 90 days.
Now I know that isn’t an exact science and just provides a rough guideline that only takes how much money you made into account.
What it doesn’t account for is all of the extra value you get from new followers on social media, new user generated content, the long term relationship of helping people, new social signals on old posts & new comments on old posts for the next 12 months.
All of which help you grow organically reaching even more people to push down the email engagement funnel.
Creating A Compelling Offer
Instead of spending a bunch of time creating something unique to offer in exchange for a users email address, I spent time looking at what content I already had.
After going through my archives I picked out a couple of tutorials that I could convert into a PDF to use as the offer.
I eventually settled on my top 100 tutorial which could appeal to a range of audiences.
The other benefit was that post makes a great first impression on new subscribers keeping them hooked in and engaged throughout.
The quickest way to convert an old post into a PDF is with the print friendly extension.
That really was all there was to creating the offer!
Creating The Landing Page
The landing page is one of the most critical parts of any campaign. This can literally make or break the entire campaign.
If you have a poor performing landing page you are going to burn through money quicker than you can blink.
I used LeadPages to create my landing page. They provide easy to modify time tested templates to ensure your landing page delivers high conversion rates.
I have put together a quick tutorial showing you how to use LeadPages to setup your mobile responsive landing page, split tests and even publish your landing page as a Facebook tab.
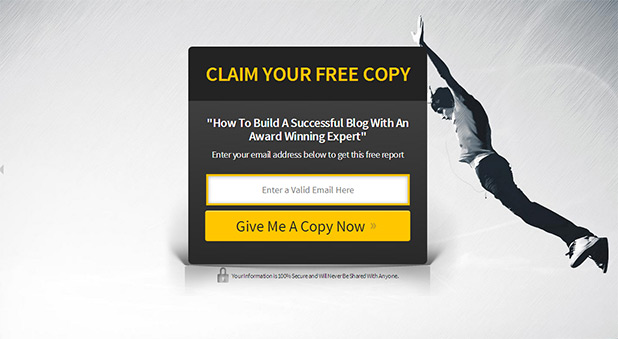
My Landing Page Design
This is the first landing page I created in LeadPages – it took me the best part of 5 minutes to put together.

Pretty clear, simple & straight to the point.
Setting Up My Split Test
In order to optimise the campaign as much as possible I spent 10 minutes creating a couple of alternative landing pages to split test against the page above.
I have spoke about the importance of split testing before and LeadPages makes it really easy to do.
Landing Page Version 2
Exactly the same as the original except a different background image-
Landing Page Version 3
Exactly the same as the original except a different background image-

Split Test Results
Just to highlight the importance of landing pages and split testing I wanted to share the results of the split test now.
Here is a screenshot from LeadPages showing you the performance of each landing page above-

As you can see the original is converting at 38% while version 3 is only converting at 33%. That makes a huge difference on the bottom line of the campaign.
With this data in hand I can take the winner and split test that against completely different templates, new background images or just by tweaking the copy.
The ‘Thank You’ Page
Once a user has hit the landing page and entered their email address, we need to take them to a final page in their journey.
Generally people use the ‘Thank You’ page for delivering the offer. But I’m also using it to generate new Facebook subscribers & affiliate sales.
This is what my ‘Thank You’ page looks like-

Nothing complicated, just simple & straight to the point!
Creating Your Facebook Advertising Campaign
Now we have everything we need to create our Facebook advertising campaign and start generating new subscribers instantly.
All we need to do now is-
- Create a tracking pixel
- Create Facebook campaign
- Create Facebook ads
Once that is done you will have everything you need to orchestrate a high performing Facebook marketing campaign!
Creating The Tracking Pixel
Facebook lets you create a tracking pixel that you can place on any page you want.
![]()
Then you just need to copy the tracking pixel code to your ‘Thank You’ page or whatever it is you want to track.
A quick note, you can edit the tracking pixel code to include a value that gets reported to Facebook-
fb_param.value = ‘0.00’;
fb_param.currency = ‘USD’;
You can change that to be the value of each new email subscriber/conversion. So every time someone clicks your Facebook ad and converts, it gets reported in the back end of Facebook.
Sometimes this doesn’t work though, for example according to Facebook I had 456 new subscribers – but there were actually 496 in Aweber so just use this as a guideline.
Creating A Facebook Advertising Campaign
When your creating your campaign & adverts you should make sure you are using the Power Editor.
This is much easier to work with than the standard interface and gives you a lot more control over things.
I have created a quick video showing you how to create your first Facebook campaign using the power editor-
Creating Facebook Ads
Once you have created your Facebook advertising campaign you need to create some adverts.
This is really easy to do and I suggest you create a couple of different adverts targeting different audiences to test which works best.
Learn how to do all of that and more with this video-
My Facebook Advertising Campaign Results
I setup 2 separate Facebook campaigns spending a total of $599.91 generating a total of $17,204.46 based on an email subscribers $17.81 value.
| Campaign | Cost | Income | ROI |
|---|---|---|---|
| #1 | $300.00 | $8,883.76 | 2,851% |
| #2 | $299.91 | $8,370.70 | 2,691% |
Campaign #1 Details
I set everything up as above and targeted 4 different audience types – blogging, blogspot, wordpress & people who had liked my competitors.
I created 3 different adverts for each of the 4 audiences to see which advert converted best for which audience.
These are what the 3 adverts look like – AD1, AD2 & AD3.

Campaign #1 Performance
This table summarises the performance of each advert and the campaign as a whole-
| Ad | Cost Per Lead | Spend | Clicks | Cost Per Click | Click Through Rate | Page Likes |
|---|---|---|---|---|---|---|
| #1 | $0.94 | $45.43 | 224 | $0.24 | 0.87% | 23 |
| #2 | $0.69 | $232.02 | 1,236 | $0.20 | 1.60% | 164 |
| #3 | $0.35 | $22.55 | 103 | $0.28 | 0.66% | 13 |
| Totals | $0.66 | $300.00 | 1,563 | $0.24 | 1.05% | 200 |
The $300 spend resulted in-
- 496 new subscribers
- 200 new Facebook page likes
Making for a total of new subscriber value of $8,883.76 or 2,851% ROI.
Campaign #2 Details
Exactly the same as the previous campaign except this time-
- I took the best performing ad from the previous campaign (AD2) & created 2 new ads (AD4 & AD5)
- I took the best performing LeadPages landing page from the previous campaign & created 2 new variations
- I added 2 new audiences – people interested in SEO & people attending internet marketing conferences
I was looking to increase conversion while reaching new audiences at the same time.
This is what the 3 adverts looked like, AD2, AD4 & AD5-

Campaign #2 Performance
This table summarises the performance of each advert and the campaign as a whole-
| Ad | Cost Per Lead | Spend | Clicks | Cost Per Click | Click Through Rate | Page Likes |
|---|---|---|---|---|---|---|
| #2 | $0.54 | $54.47 | 336 | $0.18 | 1.14% | 48 |
| #4 | $1.17 | $48.09 | 279 | $0.19 | 0.96% | 23 |
| #5 | $0.66 | $197.35 | 1,201 | $0.17 | 1.60% | 101 |
| Totals | $0.79 | $299.91 | 1,816 | $0.18 | 1.23% | 172 |
The $299.91 spend resulted in-
- 470 new subscribers
- 172 new Facebook page likes
Making for a total of new subscriber value of $8,370.70 or 2,691% ROI.
As you can see I was able to reduce the cost per click and increase the click through rate.
However the cost per lead was higher as the new landing page designs didn’t really work out.
But that does mean I now have all the data I need to fine tune the entire funnel end to end!
Wrapping It Up
So there you have it, how to advertise on Facebook step by step! Facebook marketing can’t really get any easier than that!
There are lots of different ways for you to take advantage of Facebook advertising. Building your email list is just one of them.
Take what you have learnt here and get creative with your own campaigns!
All you need is a compelling offer, a good landing page and an email autoresponder to get started!
If you have any extra tip & tricks let me know in the comments!
Original article posted on the MatthewWoodward blog.
Meet Matthew Woodward
Award winning blogger. Learn how to build a top 100 blog with him here: http://www.matthewwoodward.co.uk/top100/.