
Creating Images with Text: Photoshop CC Tutorial
February 25, 2015 | By Emily Goodrich | 7 Comments">7 Comments
Everything about social contests revolves around high quality images – images speak louder than text. But how do you create a high-quality image with text quickly? A good resource for manipulating images for contests is Photoshop; but Photoshop can be a monster if you’re looking at it for the first time. So, what can you do?
Well, we do have a list of photoshop alternatives and free photo editors, but if you have access to Photoshop, it’s the best tool for the job. In this tutorial I’ll go over some basic tools for Photoshop newbies and how to use them in creating images for your next contest.
Photoshop Tutorial: Tools of the Trade
Note: This Photoshop tutorial goes over some basic tools and techniques for creating useable images for contests. If you would like to go more in depth on creating standout visual content, check out Brooks’ guide here.
Before we begin, if you are selecting images from online sources, do not just grab an image from Google Image Search. These images often come with copyright attached to them, and can mean trouble if the owner finds their image on your contest. If you absolutely must have an image from an online source, use creative commons search or a site like pixabay.org. These sites can point you to royalty free images.
Once you have your image (or set of images) ready, create a file on your desktop containing everything you will need for you image. Each element needs to be found in the same place on your computer. For this tutorial, I will be using an image and an Adobe Illustrator file on a Macbook Pro.
Here is the set up I will be working with.


Next, we’re going to take a look at the left side tool bar and the layering menu. You can see the toolbar to the left. The tools you will most likely need to use on a regular basis are marked in red.
Note: If I refer to a tool you do not see, try clicking on a tool and holding for a second. A drop down menu should appear with that tool listed.
The most commonly used selection tool, aside from the rectangle selection tool, is Quick Selection – the paintbrush-looking tool. The lasso tool is next – the best lasso to use is the Magnetic Lasso, which can be found under the Lasso Tool menu.
The Crop, Brush, Eraser, and Text tools have similar analogs in most photo editing software and function as you would expect them to. Please note, however, that if you have an area of the photo selected, the Brush and Eraser tool will only affect the selected area. This means that, if you need to remove or retouch something in the background, you will want to select that area first, to avoid affecting another part of the image by mistake.
At the bottom of this tool bar is the color selection tool. There is a larger one on the right side of the screen, but this one controls the foreground and the background color for all tools. This will be especially important for text – right now, my text is white with a white background.

The Layer Menu is also vital to understand – when you make change, Photoshop puts that change on a new layer. This means that you need to select the layer that the edit is on. If you add text, for example, you’ll need to click on the text layer to edit the text.
If a layer is locked, you can’t make major changes to it. To change the background, right click on the background layer and click ‘Duplicate Layer.’
The eye on the left determines whether or not that layer is visible. You can create a new layer, delete a layer, or create a layer folder using the icons at the bottom of the layer section.
Photoshop Tutorial: Editing Your Image
The first thing we’re going to do is resize the image to fit the Heyo templates – the strict requirement is 2.0 MB for your image size. My image is 16 MB; to change the size, click on the ‘Image’ tab in the main menu and click on ‘Image Size.’  This will open a sizing menu. The first thing I did was restrict the image to a smaller pixel size and dpi (dots per inch). The ideal dpi for the internet is 72 dpi, so after I restrict the image to a size, I want to change the dpi to 72.
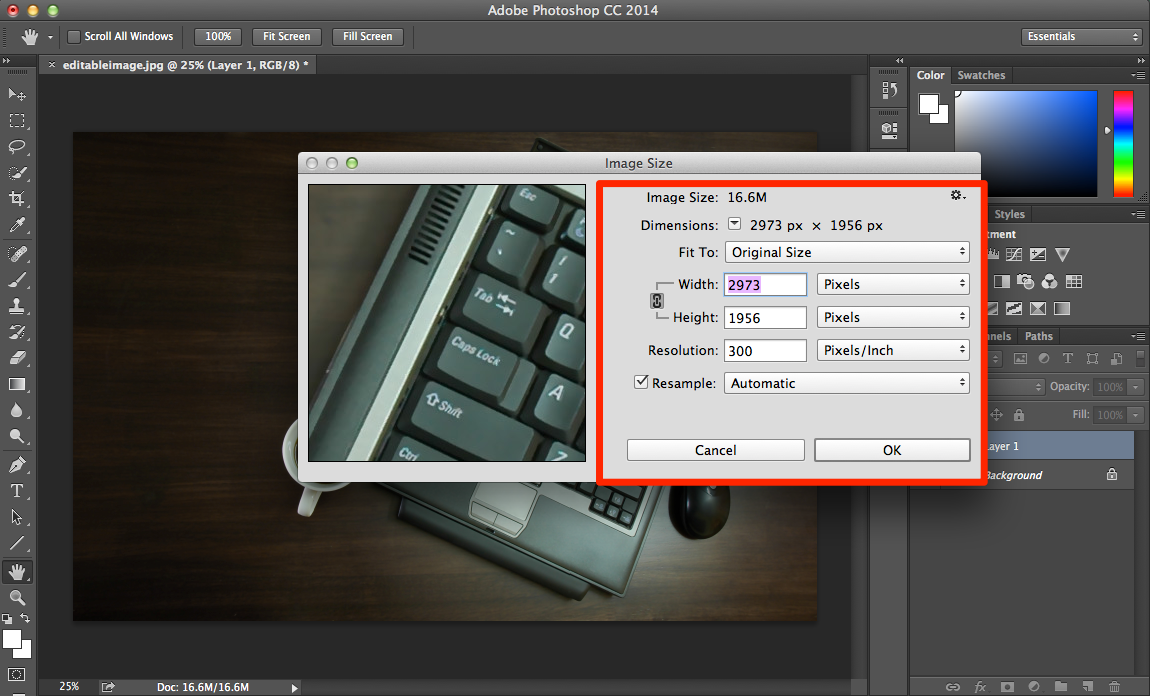
Now, I bet you’re thinking – if 300 dpi is a higher resolution, why don’t we just keep it that size? The answer is that a 300 dpi image is larger and makes your page slower to load. I used a custom setting to reduce the size, and changed the dpi below – the file size has been reduced to 444.4 K. This means that the image will fit my template and won’t slow down the campaign’s load times.

Note: Keep ‘Resample’ checked – this links the width and height to each other, so you don’t need worry about translating pixels to inches.
Once you click ‘Okay’ the workspace may be zoomed out – if the image looks incredibly small, try zooming in before revisiting the Image Size menu.
Next, we’ll be adding text to the image. Remember that adding text is going to add a new layer to the file. To add text, click on the Text tool in the toolbar, and click on the area of the image you want to add the text to.

Changing the text is very similar to changing the text in Microsoft Word – the font options open at the top of the screen when you click on the text tool. Select a text that is easy to read over your background – darker backgrounds need lighter fonts, for example.
Next, I’m going to add my logo to this image. I have an Adobe Illustrator file of the Heyo Logo in my tutorials folder with a transparent background; any images you add into a photo in Photoshop will need to have a transparent background. If you need to know how to make transparent images, or how to make logos in Adobe Illustrator, click here for a Udemy tutorial on transparency and here for a Illustrator walk through.
To add an image, open the File menu and click ‘Place Linked.’ This will open a dialogue box where you can select your logo or other image.

Select the file and set the bounding settings to the ones I have in the example below.
 This will create a new layer for the logo – you can resize and reposition the logo using the selection arrow at the top of the toolbar (if it is not already selected).

Note: Make sure the logo layer is selected, as it is in the example above.
Once you have your text and logo positioned the way you want them, it’s time to save the image! You have quite a few saving options – I recommend saving the image first as a .psd (Photoshop) file, just in case you want to make changes to this image in the future.
To save the image for use in a campaign or contest, click on the ‘Save As’ option in the File menu, and then change the file type from Photoshop to PNG. Note that you can save images at JPG files as well, but if you have made an image transparent, you will need to save it as a PNG to maintain transparency.

That’s it! Your image is now campaign ready.
Your Turn
Did I miss anything? If you have any questions or comments about Photoshop, leave them in the comments below!
Meet Emily Goodrich
Emily Goodrich is a Technical Writer at Heyo. She is a Senior studying Creative and Professional Writing at Virginia Tech.